INSTALLATION OF THE COUNTERTOP PURIFIER
Water Filter Canada Water Treatment Systems
Installation, Cleaning and Troubleshooting Guide
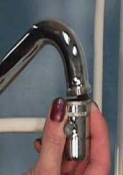
1. Diverter Valve . Remove the aerator from the end of the faucet. Make sure that you remove the old rubber washer as well. If the washer is in poor condition, then purchase another one as this fitting must be re-installed later. Compare the faucet threads to ensure that they match the diverter valve. If the threads are different then you will require an adapter. If an adapter was not supplied with your new unit then you will need to identify the make and possibly the model of the faucet to order one. Adapters are normally available from any full service plumbing supply or large hardware store.
2. Lubricate the new diverter valve stem with vegetable oil. Pour a drop of oil into the top of the valve and then work the stem in and out. Note: This procedure should be done every few months to keep the valve lubricated internally.
3. Ensure that the washer in the top of the diverter valve is also lightly lubricated and positioned flat.
4. Using finger pressure only, screw the diverter valve onto the faucet threads. The threads are easily damaged so ensure that it goes on straight . If you cannot thread it on by hand then something is wrong. Stop and investigate.
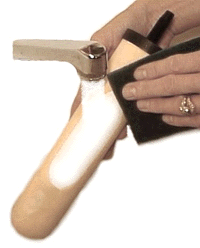
5. Once the valve is screwed on finger tight, then a pair of pliers can be used to snug it up. It does not require a large force. Position the hose so that it does not interfere with the sink before the final tightening. You can use elastic bands to hold the hose tight to the faucet so that it remains out of the way.
6. The original aerator fitting removed from the faucet could now be re-installed on the bottom of the diverter valve in the same fashion as mentioned above. These fittings can be in very bad condition due to their age and exposure to different minerals in the water. If in doubt, purchase a new one.
7. Unscrew the sump (white portion) from the head (gyre base) and lubricate the black "o" ring in the sump with Vaseline (never use mineral oil). Remove the bubble wrap packaging from the ceramic cartridge. If the ceramic is not already installed, inspect the new ceramic for any damage or cracks. If the threaded end cap of the ceramic has a retainer holding the large black washer in place then remove the retainer.
8. Gently thread the ceramic into the base until it is snugly seated onto the black washer. Extensive force is not required and no tools should be used. If you do not have sufficient wrist strength then ask for assistance.
9. Carefully place the sump over the ceramic and thread it into the head. Again, hand tight is all that is required.
10. Place the complete unit into the sink. Turn on the cold water slightly so that it flows through the diverter valve into the sink. Inspect for leaks around the diverter valve faucet connection and the aerator connection.
11. Pull on the diverter valve stem (sending water to the filter housing) and again inspect for any leaks from the diverter valve connections or the sump "o" ring.
Note: If a leak is observed, simply turn off the cold water tap, wait for the pressure to drop and then snug up the leaking connection as required.
12. Increase the water pressure and again observe for leaks for a least two minutes. While observing, rotate the filter unit onto each side so that the top of the sump is held lower than the head (gray section). This will allow excess air to escape from inside the unit enabling it to work more efficiently. Let the unit run upside down (gray section up) for one (1) minute.
Note: Each time you install a new ceramic you will see small black specks in the water for the first minute or so. These specks are carbon dust from manufacturing which will quickly flush away. These are harmless if consumed.
13. Turn off the cold water. Make sure the diverter valve resets once the pressure drops. Dry the unit off and place it on the counter.
Your BelKraft Drinking Water system is ready for use!
CLEANING AND MAINTENANCE
Note: Prior to service, ensure you have some petroleum jelly (Vaseline) on hand along with a brush or rough pad for cleaning the ceramic.
1. To service a counter top system, ceramic cleaning or cartridge replacement, place the unit into the sink.
2. Unscrew the sump containing the cartridge you wish to service and let the water run off.
3. Lift up the head (gray piece), with the cartridge still installed and drain off the remainder of the water. Place the unit back on the counter beside the sink. Remove the ceramic and clean following the instructions provided below in the HIP/HIS cleaning and maintenance section.
4. Using a stiff brush, or scouring pad, scrub the outer surface of the ceramic under running water until it returns to a uniform off white colour (yellow tint). Do not scrub too close to the mount. This is the area most prone to accidental breakage during installation or removal so it is best to keep the ceramic as thick as possible next to the mount.
CAUTION: Always keep the inlet up (threaded mount) and do not allow the inlet to come into contact with the running water.
Note: Never use soaps, detergents, bleach, or any other chemical during the cleaning process. These could harm the performance of your unit. Excessive cleaning shortens the life of the ceramic substantially.
5. Lubricate the "o" ring in the sump and replace the sump. Hand tighten only. Place the unit into the sink and let the water flush for one minute.
DIVERTER VALVE SERVICE
1. The diverter valves must be service regularly. The exact service interval is impossible to dictate as it is the condition of the incoming water that requires the valve to be serviced. Mineral deposits and contaminants in the water will build up on the internal "O" ring seals and cause the valve to stick or become stiff to operate. Failure to service the valve will eventually cause the "O" rings in the valve to fail. This condition is not covered by the warranty.
Note: A good rule to follow is to service the valve each time you clean the ceramic .
2. Unscrew the diverter valve from the faucet. Place a single drop of liquid dish washing soap into the top of the valve and steadily operate the diverter valve stem in and out. Continue to do this under a fresh stream of water to flush away the soap.
3. Place several drops of liquid cooking oil (canola not olive oil) into the top of the valve and again operate the diverter valve stem.
4. Connect the diverter valve, test for leaks and return the unit to operation.
<< Back to Water Purifiers
|
